- Subscribe to RSS Feed
- Bookmark
- Subscribe
- Printer Friendly Page
- Flag this to a Moderator
November 2017
Hey everyone,
Here are instructions on how to set up WiFi calling. It's pretty easy, but we included pictures to make it even easier  (click images to enlarge)
Wi-Fi Calling lets you use your phone in all the ways you're used to, but in more places. You can make and receive calls, plus send and receive messages, all over Wi-Fi. It’s perfect for when you have no bars or a weak signal — meaning you can still keep in touch from basements, cottages or wherever else you feel disconnected!
When in Canada, all incoming and outgoing messages and calls that are to or from a Canadian number will be taken from your voice minutes and messaging limits that come with your monthly plan. No long distance charges will apply. Sweet, right?
If you go over your plan's limit, you'll have to pay overage fees or some extra Pay-Per-Use fees. All outgoing messages and calls to non-Canadian numbers will be charged based on the rates in your plan or current Pay-Per-Use wireless rates.
Heads-up: You may get charged for long distance and/or international messages if your VPN, DNS or internet provider is set to a country outside Canada.
Click here to check out all of the FAQs.
Note: Your compatible device must have been purchased from Fido. If you have a non-Fido device and no conflicting services, Wi-Fi Calling may work, but we can’t assure that the feature will work properly.
Compatibility
- iPhone (must have iOS 9.0 or above): Eligible iPhones purchased from Fido as well as outside Fido: iPhone 5c/5s and above
- Android: Eligible Android devices purchased from Fido (must have Android software 6.0 or above).
↓ INSTRUCTIONS ↓
iOS
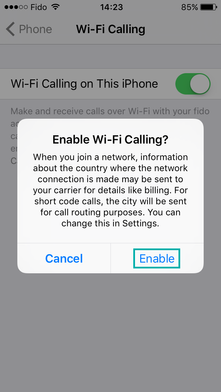
1. Go to Settings → Phone → Wi-Fi Calling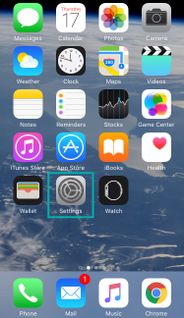
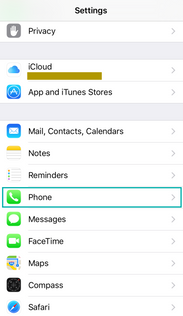
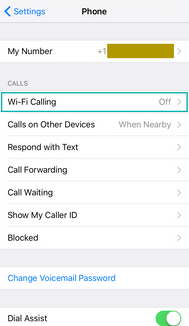
2. Toggle Wi-Fi Calling to ON then follow the instructions on the screen if it’s the first time you’re hooking it up.
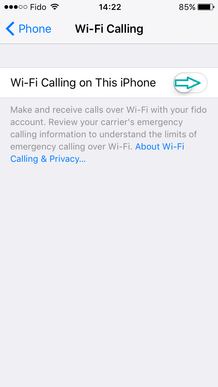
The status bar will show “WiFi Fido” when Wi-Fi Calling is ready.
LG
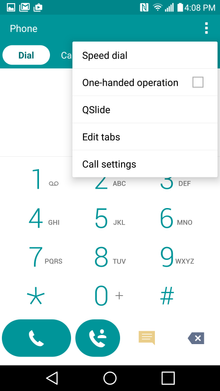
1. Open your phone app (the one you use to make calls), select the options/menu button (three dots) at the top corner, and select Call settings
2. If you’re already registered for Wi-Fi Calling, move the Wi-Fi Calling toggle switch to the ON position, and you’re done! The status bar will display the Wi-Fi Calling icon when Wi-Fi Calling is ready to use. Easy peasy.
Or, if it’s your first time enabling Wi-Fi Calling, click on Wi-Fi Calling. This will bring you to the Wi-Fi Calling page, where you can follow the remaining steps:
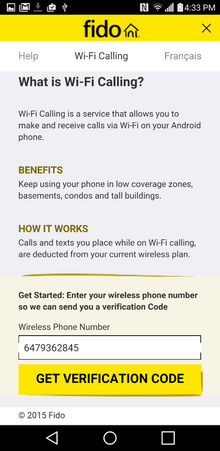
3. Click on the link to register for Wi-Fi Calling.
4.Enter your phone number and select “Get Verification Code”. You’ll receive a text message with your verification code.
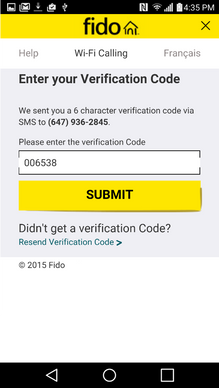
5. Enter your verification code and press “Submit”.
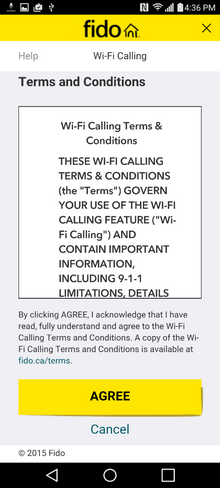
6. Accept the Terms and Conditions.
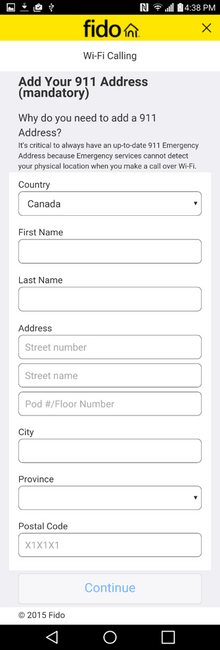
7. Enter your emergency address and press “Continue”.
The portal will now display two versions of your emergency address: One version shows your address exactly as you just entered it, and the other is a Canada Post-recommended version of your address. Select the version you want to use (we recommend using Canada Post’s version). Once your address is verified, you’ll receive a text message confirming that your registration is complete.
8. Go back to “Call settings”and then toggle the Wi-Fi Calling switch to the ON position, and you’re done! The status bar will display the Wi-Fi Calling icon when Wi-Fi Calling is ready to use. Ta da!
Samsung
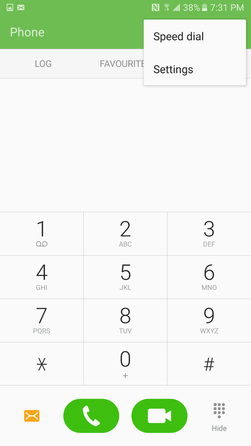
1. Open your phone app (the one you use to make calls), tap on MORE at the top right corner, and then Settings:
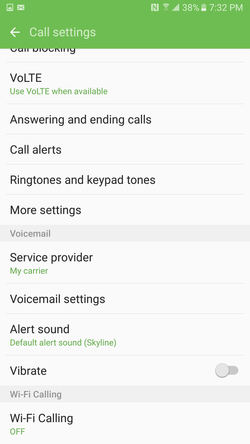
2. If you’re already registered for Wi-Fi Calling, tap on Wi-Fi Calling at the bottom and then toggle switch to the ON position, and you’re done! The status bar will display the Wi-Fi Calling icon when Wi-Fi Calling is ready to use. Easy peasy.
Or, if it’s your first time enabling Wi-Fi Calling, tap on Wi-Fi Calling. This will bring you to the Wi-Fi Calling page, where you can follow the remaining steps:
3. Click on the link to register for Wi-Fi Calling.
4.Enter your phone number and select “Get Verification Code”. You’ll receive a text message with your verification code.
5. Enter your verification code and press “Submit”.
6. Accept the Terms and Conditions.
7. Enter your emergency address and press “Continue”.
The portal will now display two versions of your emergency address: One version shows your address exactly as you just entered it, and the other is a Canada Post-recommended version of your address. Select the version you want to use (we recommend using Canada Post’s version). Once your address is verified, you’ll receive a text message confirming that your registration is complete.
8. Go back to “Settings”and then toggle the Wi-Fi Calling switch to the ON position, and you’re done! The status bar will display the Wi-Fi Calling icon when Wi-Fi Calling is ready to use. Ta da!
What else you need:
- Have your phone’s Wi-Fi Calling feature turned On.
- Be signed up for a voice and data plan with a monthly bill.
- An LTE SIM inserted into your device.
Note: Wi-Fi Calling isn’t available to Prepaid service customers.
*If you have any of the following features, you won’t be able to use Wi-Fi Calling:
- Data blocking
- Teletypewriter
To use Wi-Fi Calling, you must remove these services or features from your account.
Enjoy!
